Monday, September 9, 2013
Some more progress in the past few months
Since April I've had the neck cups I installed removed and replaced with a set that has internal stops. The engine is almost complete, and the transmission is loosely mounted in the frame.
Starting at the front end:
I have a 6* raked WideGlide front end installed with long front legs. I forget their actual length...maybe 29"? I *think* they're about 4" too short for the stance I want. I'll know for sure in the coming weeks. I was able to trade a few of my hand made pens for the front end, but the left lower leg was damaged--the brake bracket's mounting screws were broken off in the leg. I tried drilling and removing them, but had no luck. I had a set of nearly new late model FLH lower legs (41mm) so I installed them. It was my first attempt at changing fork seals along with swapping lower legs. It was surprisingly easy. I had thought there was some kind of voodoo magic inside fork legs. I found out, instead, that some brute force is needed to take them apart and a bit of finesse and care to put them back together. Here you can see them mounted, backwards of course...but they've since been fixed:
Sadly, though, with those lower legs, I ran into another stumbling block--these lowers require a 1" axle. My 21" rim has 3/4" bearings. Finding a 21" rim with a 1" axle is proving difficult, and will likely be expensive. So...I'm looking into simply replacing the bearings with 1" bearings. I already have the rotors for the rim, but they aren't mounted yet.
Onto the engine!
I got the oil pump mounted up in July:
I installed the cam, oil pump drive gear, and breather gear in July, also. It looks off, but that's only because my camera was tilted when I took the shot. It's actually lined up properly.
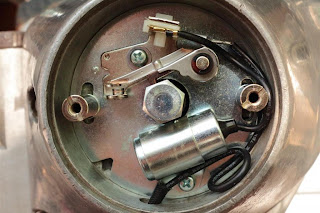
I then moved on to installing the cam cover, timing advance weights, and the points ignition:
I next had time to work on the bike in August. Notice a problem here? Hint: See that threaded hole? This is supposed to be the rear rocker box. Yes, it *can* work this way, but the oil line routing would be ugly and a pain, so they needed to be pulled and swapped.
I removed the acorn nuts from the heads and the rocker boxes. Yes, they look nice, but they're a pain to work with; they're difficult to fit a socket over. I replaced them with "regular" hex nuts. While replacing them, I found what might have caused a problem later on--two rocker studs that were recessed too far into the heads:
To fix them, I simply put two nuts on each stud, tightened them against each other, and backed the studs out a bit. I then put the rocker box back on and secured it on.
Once that was fixed I moved onto the lifter blocks. I'm using Evolution engine style lifters included with the Velva Touch lifters and push rods. Not a big deal until you realize that my engine case requires a 1/4-24 thread on the mounting screws along with counter suck screws for the original blocks. These blocks need flat head screws...trying to find them in 1/4-24 is nearly impossible. Even McMaster-Carr doesn't carry them. To get around it, a friend of mine took some long 1/4-20 Allen head screws with sections of unthreaded shaft, cut them down to 7/8" long, and threaded them with a 1/4-24 die. And then...one needs a pair of counter sunk guides to center the lifter blocks on their mounting holes...and all those guides are 1/4-20. I cheated and used my original counter sunk screws to center them:
With a pair on each corner, I put the Allen cap screws on the opposing corners, removed the guides, and installed the other screws.
Next I installed the rocker box oil feed lines. The original equipment is stainless tubing, but I wanted something that would match the braided lines I had on the other side of the engine. I didn't think to contact Summit and order matching hardware; instead I found a set of premade lines. At a later date I'll remove these and replace them with Summit gear.
After installing the oil lines, I had hoped to install the push rods and their tubes...and have the engine completed. Sadly, though, for lack of the cork/rubber seals for the tubes, I was halted. I know that I have a set of them somewhere...but have lost them at some point. They're inexpensive, so I ordered a new set yesterday and will hopefully finish the engine later this week.
Subscribe to:
Post Comments (Atom)


No comments:
Post a Comment