Sunday, December 8, 2013

A mockup

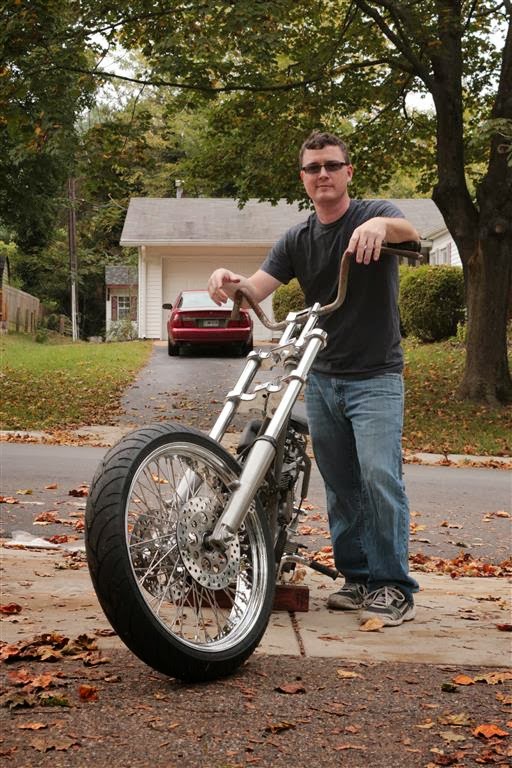
I took these pics two months ago, but forgot to post them up.  This is with the 5" shocks under the seat.  I might go with 4" or even 3" by the time I'm done.  The bar mounted now is the original my dad had; it's too short.  I'll run one 6-8" higher to pull me forward a bit in an effort to assist my back in absorbing bumps in the road.


A few more steps forward

Last night I created a support bracket to ensure my big-assed carb and air cleaner don't fall off while I'm running down the road.  It's just a simple 1/8" thick by 1" wide piece of mild steel with a mild z-bend in it and holes drilled to match.  It mounts onto the case bolt located at the bottom of the cylinder V and at the intake.  I plan on drilling a hole in it and inserting a grommet to run my fuel line through--this will stiffen the line a bit, keeping it from bouncing around and keep it safely away from the cylinders.


Tuesday, November 5, 2013

Last night I was taught a bit of humility...

I'll admit it--I'm nervous about welding on my kick stand mount. Angled too far down and the bike will be easy to knock over. Too far up and the bike will lean over too far AND the end of the kick stand will hit the clutch basket when it's drawn up. So last night I loosely mount my clutch basket and primary belt. I then leaned the bike over on and held the kick stand in place where I thought it would be perfectly balanced. I marked the location on the frame and propped the bike up on blocks. Then I pulled the clutch off and tacked the mount in place. Instead of putting the kick stand on and checking the angle, I foolishly plowed ahead and did a gawdawful welding job to lock it in place. After I was done with that bit of stupidity, I put the kick stand on and tested the angle. Too steep. A stiff wind will knock the bike over, not to mention trying to kick start the damn thing. Tonight, the grinder comes out and the mount comes off. This time, I'll tack it in place and test it before continuing. And I think I'll not do anything more than tack it--my welding sucks. I'll have somebody else weld it on.

Monday, November 4, 2013

Installing new forward controls

I bought a set of used forward controls for cheap, but they won't work with what I want to run. So...I bought a set of new, after market Dyna style forward controls. They won't work, either, without some welding and drilling. I filled the holes that weren't needed by welding, then marked, drilled, and tapped holes to install the new mounts. Holes drilled for better welds:
Holes welded up:
And then ground smooth:
It appears I don't have any pics of the forward mounts installed. I'll put them up later.

I have my seat (mostly) mounted

Dad originally had a king and queen seat on this thing. I'm going a different route. I have a hinged, sprung solo seat given to me by a member of www.chopcult.com and will mount a pillion on the rear fender and a pad on the sissy bar. To mount the shock mounts, I had to remove the original fender mounts:
Then I marked the center line on the cross member, and then the center marks for the bracket locations:
Then I tacked the brackets in place on top of the cross member and the front mount near the split, but neglected to take pics of them. I then mounted up the seat to see how it looked:
As you can see, the angle is too severe, being vertical. I cut them off and rotated them back as far as I could without the cross member interfering with the springs on the shocks and came up with this:
I rolled it out to see what it would look like with me on it. I think I might go with 4" shocks over these 5" in the future. I also know that I'll end up with a slightly taller set of apes, maybe another 4-6" or so. The bars on now are what my dad originally ran, but they won't work for me; I want to lean forward just a bit to help absorb the bumps in the road. I needed to mount them to figure out the proper height AND to make it easier to push the bike around. Ever wonder how difficult it is to steer a motorcycle by only holding onto the top triple? It isn't easy! Add to that the long front end and tall wheel...you NEED handle bars to control it!

I'm learning to weld!

The Shovel is gonna need quite a bit of welding before it's done. Some of it (that I can remember right now) includes seat mounts, gas tank mounts, oil filter mount, rear brake MC mount, rear brake stay mount, passenger peg mounts, kick stand mount, and so on. I'm no welder. Heck, until about a month ago, I had never done it. Several months ago the missus' uncle loaned me his cheapo HF 90A flux core welder. I'm pretty sure he wants it back at some point, but as it hadn't been opened when he gave it to me, and he has had it for many months prior to handing it over, I don't think he's in much of a rush to get it back. I started by buying some hot rolled mild steel stock from Lowe's to practice on. I just cut it into pieces and played with welding them together. Along with the steel I bought an HF angle grinder. With flux core, it's a must. Lots of bb's get thrown on the surrounding metal and they must be ground off. Some of the welding I'll complete, but on the high stakes stuff, I'll have a buddy do the welding--I'll tack the parts in place and then have him weld it up. I first welded up the holes on the back bone of the frame that were used to mount the gas tank. I then ground them smooth. When I get the tank in hand that I'll eventually use, I'll drill new holes and weld in threaded bungs to support it. I'll post up a blog when that's done.

Intake manifold blues

At some point in the past few years I bought what I thought was an OEM-style intake. It might well be, but it doesn't fit. If anything, that gap should be smaller than original because the surfaces on the cylinders and heads, where they meet, had been milled slightly to ensure they were flat. So I called S&S and handed over information needed to cast and cut an intake that will fit. I received it the other day...and while it fits, my carb won't fit on it. I called S&S back and explained what I had. The tech I spoke to found the problem--the catalog part number was incorrect. He's having a new intake made and will ship it directly to me when it's done instead of out to the dealer and then to me. Once it gets here I'll be able to fab a support bracket and mount my carb.

Monday, September 9, 2013

Some more progress in the past few months

Since April I've had the neck cups I installed removed and replaced with a set that has internal stops. The engine is almost complete, and the transmission is loosely mounted in the frame. Starting at the front end: I have a 6* raked WideGlide front end installed with long front legs. I forget their actual length...maybe 29"? I *think* they're about 4" too short for the stance I want. I'll know for sure in the coming weeks. I was able to trade a few of my hand made pens for the front end, but the left lower leg was damaged--the brake bracket's mounting screws were broken off in the leg. I tried drilling and removing them, but had no luck. I had a set of nearly new late model FLH lower legs (41mm) so I installed them. It was my first attempt at changing fork seals along with swapping lower legs. It was surprisingly easy. I had thought there was some kind of voodoo magic inside fork legs. I found out, instead, that some brute force is needed to take them apart and a bit of finesse and care to put them back together. Here you can see them mounted, backwards of course...but they've since been fixed:
Sadly, though, with those lower legs, I ran into another stumbling block--these lowers require a 1" axle. My 21" rim has 3/4" bearings. Finding a 21" rim with a 1" axle is proving difficult, and will likely be expensive. So...I'm looking into simply replacing the bearings with 1" bearings. I already have the rotors for the rim, but they aren't mounted yet. Onto the engine! I got the oil pump mounted up in July:
I installed the cam, oil pump drive gear, and breather gear in July, also. It looks off, but that's only because my camera was tilted when I took the shot. It's actually lined up properly.
I then moved on to installing the cam cover, timing advance weights, and the points ignition:
I next had time to work on the bike in August. Notice a problem here? Hint: See that threaded hole? This is supposed to be the rear rocker box. Yes, it *can* work this way, but the oil line routing would be ugly and a pain, so they needed to be pulled and swapped.
I removed the acorn nuts from the heads and the rocker boxes. Yes, they look nice, but they're a pain to work with; they're difficult to fit a socket over. I replaced them with "regular" hex nuts. While replacing them, I found what might have caused a problem later on--two rocker studs that were recessed too far into the heads:
To fix them, I simply put two nuts on each stud, tightened them against each other, and backed the studs out a bit. I then put the rocker box back on and secured it on.
Once that was fixed I moved onto the lifter blocks. I'm using Evolution engine style lifters included with the Velva Touch lifters and push rods. Not a big deal until you realize that my engine case requires a 1/4-24 thread on the mounting screws along with counter suck screws for the original blocks. These blocks need flat head screws...trying to find them in 1/4-24 is nearly impossible. Even McMaster-Carr doesn't carry them. To get around it, a friend of mine took some long 1/4-20 Allen head screws with sections of unthreaded shaft, cut them down to 7/8" long, and threaded them with a 1/4-24 die. And then...one needs a pair of counter sunk guides to center the lifter blocks on their mounting holes...and all those guides are 1/4-20. I cheated and used my original counter sunk screws to center them:
With a pair on each corner, I put the Allen cap screws on the opposing corners, removed the guides, and installed the other screws.
Next I installed the rocker box oil feed lines. The original equipment is stainless tubing, but I wanted something that would match the braided lines I had on the other side of the engine. I didn't think to contact Summit and order matching hardware; instead I found a set of premade lines. At a later date I'll remove these and replace them with Summit gear.
After installing the oil lines, I had hoped to install the push rods and their tubes...and have the engine completed. Sadly, though, for lack of the cork/rubber seals for the tubes, I was halted. I know that I have a set of them somewhere...but have lost them at some point. They're inexpensive, so I ordered a new set yesterday and will hopefully finish the engine later this week.

Tuesday, April 2, 2013

Starting the build again

It's been nearly a year since I've done anything on this project, but I've recently started again. I took it to a shop a week ago to have the rear end set up (spacers), the neck cups seated properly, and to ensure the frame was straight before I continued. The frame is straight, and the rear end is mostly done. The next step is to get a new set of triples (what I have now is beat to hell and ugly), mount them, block up the frame, and measure it to figure out the length needed on the fork legs. Here it is mounted up, ready for the trip home from the shop:

Thursday, May 3, 2012

It's going back together!

I started the process of reassembling the bike. It looks like the gas tank I have won't work; there isn't enough clearance for the top trees. No biggie. I'll sell this one and probably get a King Sporty tank to replace it. I'm waiting on new lifter blocks, a new cam, and push rods to arrive to complete the engine. Also finished installing both oil lines.

Tuesday, May 1, 2012

Disaster!

When I moved onto the rear cylinder, I removed the oil fitting I had put in finger tight on the rear head to apply Teflon tape, only to find the fitting was cross threaded--totally stripping it out. The top section is the stripped part; the lower is damaged from grabbing with pliers to pull it out:
You can just see the damaged threads:
Cleaning out the threads with a tap:
Disaster averted. I'm now waiting for Summit to send a replacement.

Oil lines going in

Finally got to putting the oil lines in:
Teflon tape on the threads:
It's a tight fit!
Front cylinder done:

Wednesday, April 4, 2012

Heads going on:


Done:


Rocker boxes are being repainted now and will be installed soon, along with the valve train and carburetor.

Engine final assembly has begun!

Pistons and rings installed:


Finding TDC:


Cylinders on: